
Safety Instructions
Always disconnect power before maintenance. Avoid damaged cords to prevent electric shock. Use only pool-grade sand for optimal performance. Follow all warnings in the manual carefully.
Test the GFCI before each use. Ensure the pump is placed on a stable surface away from the pool. Adhere to all safety guidelines provided.
1.1 General Safety Precautions
Always read and follow the manual carefully before using the Bestway filter pump. Ensure the pump is placed on a stable, level surface away from the pool to avoid accidents. Never use the pump if the power cord is damaged, as this could lead to electric shock. Keep children and pets away from the pump while it is in operation. Regularly inspect the system for wear and tear, and address any issues promptly to maintain safe functionality.
Disconnect the pump from the power supply before performing any maintenance. Use only pool-grade sand specifically designed for your filter to ensure proper performance and avoid damage. Always test the GFCI (Ground Fault Circuit Interrupter) before each use to ensure electrical safety. Follow all safety guidelines provided in the manual to minimize risks and ensure reliable operation of the filter pump.
1.2 Electrical Safety
Ensure the pump is connected to a grounding-type receptacle to prevent electric shock. Never bury the power cord, and keep it away from lawn mowers or hedge trimmers to avoid damage. If the cord is damaged, discard the pump immediately. Always unplug the pump before performing maintenance or repairs. Avoid using extension cords unless necessary, and ensure they are rated for outdoor use. Follow all electrical safety guidelines in the manual to protect against hazards.
1.3 Warning Labels and Symbols
Heed all warning labels and symbols on the pump and in the manual. These indicators highlight critical safety information to prevent accidents. Symbols may include warnings about electric shock, improper installation, or misuse. Ensure you understand each symbol before operating the pump.
Specific warnings include avoiding damaged cords, not burying the power cable, and ensuring proper grounding.Ignoring these labels can lead to electric shock or equipment damage. Always consult the manual for clarification on any symbol or warning to ensure safe operation and compliance with safety standards.
Unpacking and Inventory
Inspect the pump and components for damage. Verify all parts are included as listed in the manual. Contact Bestway customer service if any parts are missing or damaged.
2.1 Checking for Damaged or Missing Parts
Thoroughly inspect all components for visible damage or wear. Ensure the filter pump, hoses, valves, and sand are included. If any parts are missing or damaged, do not proceed with installation. Contact Bestway customer service immediately for assistance or replacement. Proper inspection ensures safe and efficient operation of the system. Refer to the manual for a detailed list of components to verify during unpacking.
2.2 Inventory of Components
Verify all components are included in the package. This typically includes the filter pump, filter cartridge, hoses, valves, and connecting adapters. Ensure the sand (if applicable) is present and meets specifications. Cross-reference each item with the manual’s inventory list. Check for any damage or defects. If components are missing or damaged, contact Bestway customer service immediately. A complete and undamaged setup is essential for proper function and safety. Proper inventory ensures smooth installation and operation of the filter pump system.

Installation Steps
Place the pump on a stable, level surface near the pool. Connect hoses securely to inlet and outlet valves. Ensure proper alignment and tighten all connections firmly.
3.1 Preparing the Filter Pump
Before installation, inspect the filter pump for damage or defects. Ensure all components, including hoses and valves, are included and undamaged. Wash the filter sand if necessary, using pool-grade silica sand (0.45-0.85mm). Place the sand in the filter tank and secure the lid tightly. Connect the pump to the filter, ensuring all connections are tight and properly aligned. Plug in the pump and test for leaks or unusual noise. Follow the manual for specific priming instructions to ensure optimal performance.
3.2 Connecting the Hose and Valves
Attach the hoses to the inlet and outlet valves of the filter pump, ensuring they are securely connected. Align the hose connectors with the valve openings and tighten them firmly to prevent leaks. Open the control valve to allow water flow and set it to the correct position for filtration. Double-check all connections for proper alignment and tightness. Finally, turn on the pump to test for leaks or improper connections, ensuring smooth water circulation through the system. Always refer to the manual for specific valve configurations.
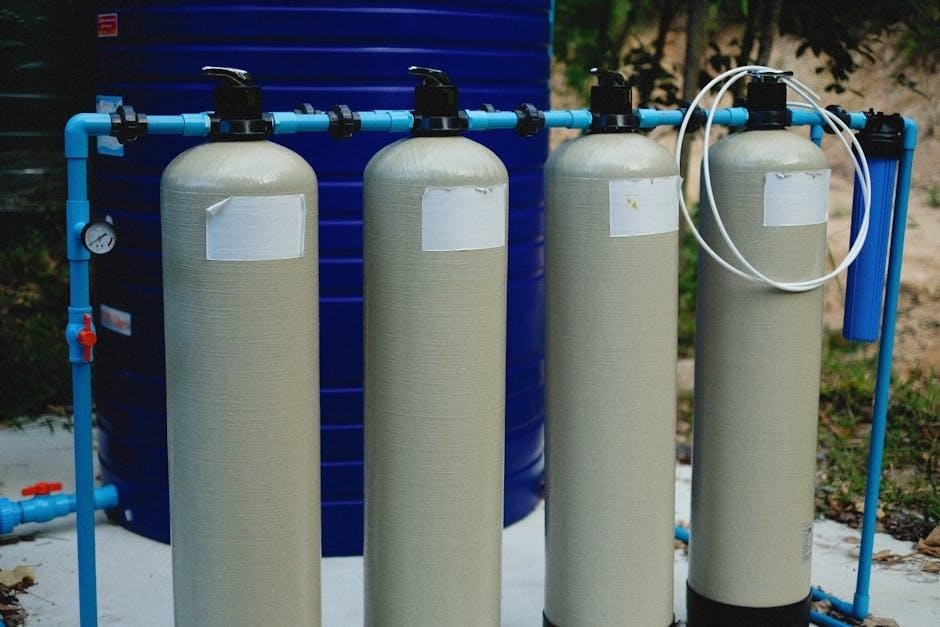
3.3 Placing the Pump on a Stable Surface
Position the pump on a flat, stable surface, such as wood or concrete, to ensure proper operation. Ensure the surface is level and at least 2 meters away from the pool to prevent electrical hazards. Avoid placing the pump on uneven or soft ground, as this could lead to vibrations or instability. Secure the pump firmly to prevent movement during operation. Keep the area around the pump clear of debris and water to maintain safety and efficiency.
Ensure the power cord is not buried or damaged. Locate it away from lawn mowers and trimmers to prevent accidental cuts. Always follow the manual’s placement guidelines for optimal performance and safety.

Maintenance and Cleaning
Regularly clean the filter cartridge and replace sand as needed. Inspect all components for damage and ensure proper operation. Follow maintenance guidelines for optimal performance.
4.1 Cleaning the Filter Cartridge
Turn off the pump and disconnect power before cleaning. Remove the filter cartridge and rinse it thoroughly with clean water to eliminate dirt and debris. For stubborn stains, soak the cartridge in a mild detergent solution. Avoid using abrasive cleaners to prevent damage. Rinse well and allow it to dry before reinstalling. Regular cleaning ensures optimal water flow and filtration efficiency. Always refer to the manual for specific cleaning instructions tailored to your Bestway filter pump model.
4.2 Replacing the Sand in the Filter
To replace the sand in your Bestway filter pump, begin by turning off the pump and disconnecting it from the power source. Open the filter by unscrewing the cap using an appropriate tool. Carefully remove the old sand and dispose of it properly. Rinse the new silica sand (20 grade, 0.45-0.85mm) before adding it to ensure optimal filtration. Fill the filter with the recommended amount of sand, then securely replace and tighten the cap. Turn the pump back on and monitor its performance to ensure everything functions smoothly. Always refer to your specific model’s manual for detailed instructions and recommended maintenance schedules.
4.3 Regular Inspection of Components
Regularly inspect the filter pump and its components to ensure optimal performance. Check hoses, valves, and connections for signs of wear or leaks. Inspect the filter cartridge for dirt buildup and damage. Ensure all electrical components are free from corrosion. Verify that the pump is placed on a stable, level surface. Look for blockages in the intake or discharge ports. Replace any worn-out or damaged parts promptly to prevent system failure. Always refer to the manual for specific inspection schedules and guidelines tailored to your Bestway filter pump model.

Troubleshooting Common Issues
Check for blockages if water flow is low. Ensure the pump is powered and plugged in correctly if it won’t start. Inspect connections for leaks.
5.1 Low Water Flow
Check for blockages in hoses or the filter cartridge. Ensure all connections are secure and not damaged. Clean or replace the filter if clogged. Verify proper sand levels and ensure the correct sand size is used. Check the pump’s positioning relative to the pool to avoid suction issues. If the problem persists, consult the manual or contact Bestway support for further assistance. Always follow safety guidelines when troubleshooting electrical equipment.
5.2 Pump Not Turning On
First, ensure the GFCI is tested and functioning correctly. Check the power cord for damage and ensure it is properly connected. Verify the electrical outlet is grounded and working. If the pump still doesn’t start, check for blockages in the intake or impeller. Ensure the filter is clean and properly assembled. If issues persist, consult the user manual or contact Bestway customer support for assistance. Always follow safety guidelines when troubleshooting electrical equipment.
5.3 Leaks in the System
Inspect all connections and hoses for tightness. Check for damaged or worn-out O-rings or gaskets. Ensure the filter cap is securely fastened. If leaks persist, apply a small amount of Teflon tape to threaded connections. Avoid over-tightening, as this may damage components; Regularly inspect the pump and hose unions for signs of wear. Replace any damaged parts immediately to maintain system integrity. Refer to the manual for specific guidance on replacing seals or connections. Addressing leaks promptly prevents further damage and ensures optimal performance.

Operating Instructions
Start the pump by plugging it into a grounded outlet. Adjust the control valve for desired flow rate. Monitor filter pressure to ensure optimal performance.
6.1 Starting the Pump
To start the pump, ensure the GFCI is tested and functional. Place the pump on a stable, level surface away from the pool. Plug it into a grounded outlet. Ensure all connections are secure and the filter is properly primed. Turn on the power and check for leaks. Allow the pump to run for a few minutes to ensure smooth operation. Monitor the system for any unusual noise or vibration. Always follow the manual’s guidelines for safe and efficient operation.
6.2 Adjusting the Flow Rate
To adjust the flow rate, locate the control valve on the pump. Turn the valve clockwise to reduce flow or counterclockwise to increase it. Ensure the valve is securely tightened after adjustment. Always check for leaks at connections after changing the flow rate. Monitor the system to ensure proper water circulation and pressure. Adjustments should be made gradually to avoid sudden changes in water flow. Keep the manual nearby for reference if needed.
6.3 Monitoring the Filter Pressure
Regularly check the pressure gauge on the filter to ensure it operates within the recommended range. High pressure indicates a dirty filter, requiring cleaning or sand replacement. Use the valve to backwash the filter if pressure exceeds the maximum level. Always monitor for warning lights or unusual sounds. Adjust the pump settings if pressure fluctuations occur. Perform daily checks to maintain optimal performance. Refer to the manual for specific pressure guidelines and troubleshooting steps. Proper monitoring ensures efficient filtration and prolongs the system’s lifespan.

Winterization and Storage
Drain the pump and lines thoroughly to prevent freezing. Clean and store the filter in a dry, protected area. Prepare the system for next season by inspecting all components.
7.1 Draining the Pump and Lines
To winterize, turn off the pump and unplug it. Disconnect hoses from the pool and drain completely. Use a soft brush to remove debris from the pump and lines. For hard-to-reach areas, ensure thorough cleaning to prevent blockages. Store all components in a dry, protected place to avoid damage from freezing temperatures. Regular maintenance ensures optimal performance when restarting in the spring. Follow all safety guidelines during the process.
7.2 Storing the Filter and Pump
After draining, clean the filter and pump thoroughly with a soft brush. Store all components in a dry, protected area to prevent damage from moisture or freezing temperatures. Ensure the pump and filter are completely dry before storage to avoid mold or corrosion. Use original packaging or sturdy boxes to protect against dust and physical damage. Check for any signs of wear or damage before storing and consult the manual for specific storage recommendations. Proper storage ensures longevity and optimal performance next season.
7.3 Preparing for Next Season
Before storing, inspect the filter and pump for any damage or wear. Clean all components thoroughly and ensure they are dry to prevent mold or corrosion. Lubricate connections and moving parts to maintain functionality. Store the filter and pump in a protective cover or bag to shield from dust and moisture. Reassemble the system carefully next season, ensuring all connections are secure. Test the GFCI and check for any leaks before restarting operation. Proper preparation ensures the system runs efficiently and safely in the upcoming season.
Warranty and Support
Bestway provides a limited warranty covering manufacturing defects. Register your product for warranty validation. Visit Bestway Support for assistance or call their customer service team.
8.1 Understanding the Warranty
Your Bestway filter pump is covered by a limited warranty that protects against manufacturing defects. The warranty period varies by component, typically covering the pump for 1 year and other parts for up to 2 years. Damage caused by improper use, neglect, or normal wear and tear is not covered. Register your product to validate the warranty. Keep your proof of purchase for any warranty claims. Refer to the manual for full terms and conditions.
For warranty-related inquiries, visit the Bestway Support page or contact their customer service team directly.
8.2 Contacting Bestway Customer Service
For any questions or concerns, visit the Bestway support website at www.bestwaycorp.com/support. Use the contact form or call the customer service hotline listed in your manual. Ensure to have your product model number (e.g., 58388E) and purchase details ready. Representatives are available to assist with warranty claims, troubleshooting, and spare parts inquiries. For faster service, review the FAQ section on their website before reaching out.