Outdoor lighting placement is crucial for enhancing beauty, safety, and functionality․ Strategic positioning creates ambiance, highlights focal points, and ensures optimal illumination for outdoor spaces effectively․
1․1 Importance of Strategic Lighting Placement
Strategic lighting placement enhances safety, aesthetics, and functionality, transforming outdoor spaces into inviting areas․ Proper positioning highlights focal points, improves visibility, and creates ambiance, ensuring spaces are both beautiful and functional while optimizing energy use and security․ Effective placement balances form and function, making it a cornerstone of outdoor lighting design․
1․2 Key Objectives: Safety, Aesthetics, and Functionality
Outdoor lighting placement serves three primary objectives: safety, aesthetics, and functionality․ Safety ensures clear visibility for pathways and steps, preventing accidents․ Aesthetics enhance the visual appeal of landscapes and architecture․ Functionality provides adequate illumination for tasks and activities․ Balancing these elements creates a harmonious and practical outdoor space that is both inviting and secure, meeting the needs of users effectively year-round․
Lighting Techniques for Outdoor Spaces
Outdoor lighting techniques include highlighting, silhouetting, shadowing, and washing․ These methods create visual interest, enhance features, and provide functional illumination while balancing aesthetics and practicality effectively․
2․1 Highlighting: Placing Lights at the Base of Features
Highlighting involves placing lights at the base of features like trees or architectural elements․ This technique emphasizes focal points, creating a dramatic effect by casting light upwards, enhancing textures and forms while providing functional illumination and visual appeal in outdoor spaces effectively;
2․2 Silhouetting: Positioning Lights Behind Objects
Silhouetting creates striking visual effects by positioning lights behind objects, casting dramatic dark outlines against illuminated surfaces․ This technique adds depth and artistic appeal to gardens and outdoor spaces, making them visually captivating at night while emphasizing specific features effectively․
2․3 Shadowing: Creating Dramatic Effects with Light Placement
Shadowing involves placing lights at the base of objects, directing the light toward a wall or surface to create dramatic silhouettes․ This technique enhances visual interest by casting bold shadows, adding depth to outdoor spaces․ Properly angled lights can amplify the effect, making features like trees or sculptures stand out strikingly in the evening, creating a captivating ambiance․
Functional Lighting for Safety and Accessibility
Functional lighting ensures safety and accessibility by illuminating pathways, steps, and entryways․ Proper placement prevents accidents and enhances visibility, making outdoor spaces usable and secure at night․
3․1 Pathway Lighting: Even Placement for Clear Visibility
Pathway lighting requires even placement to ensure clear visibility and safety․ Install lights at regular intervals on both sides of walkways, spacing them 6-8 feet apart․ Mount fixtures 6-8 inches above ground level to minimize glare․ This balanced illumination enhances nighttime navigation, prevents tripping hazards, and creates a welcoming ambiance for outdoor spaces․ Proper spacing ensures consistent light distribution for optimal functionality․
3․2 Stair and Step Lighting: Essential for Nighttime Safety
Stair and step lighting is vital for nighttime safety, reducing accident risks․ Install lights on each step, positioning them at the front edge or side․ Mount fixtures 6-8 inches above steps to avoid glare․ Ensure even illumination across all stairs, with lights spaced 12-18 inches apart․ This setup provides clear visibility, guiding users safely and enhancing the overall functionality of outdoor spaces effectively․
3․3 Entrance Lighting: Positioning Fixtures for Optimal Illumination
Entrance lighting should be positioned at eye level, 60-65 inches from the ground, to ensure safety and functionality․ Mount fixtures 6-8 inches from the door frame on both sides for balanced illumination․ Choose fixtures proportional to the door height, typically 1/4 to 1/3 of the door’s height․ Proper placement enhances security, curb appeal, and creates a welcoming ambiance for visitors․
Enhancing Architectural Features
Strategic lighting highlights architectural elements, accentuating walls and unique design features․ Proper placement transforms structures, creating a visually appealing and inviting outdoor ambiance after dark․
4․1 Highlighting Walls and Architectural Elements
Highlighting walls and architectural elements enhances the visual appeal of your outdoor space․ Position lights at eye level or slightly above to accentuate textures and designs․ For walls, use indirect lighting or wall washers to create a soft, even glow․ This technique draws attention to key features, making your home’s exterior stand out during nighttime․ Proper placement ensures a dramatic yet elegant effect․
4․2 Wall Washing: Indirect Lighting for Broad Coverage
Wall washing involves placing lights a few feet away from the wall at an indirect angle to create a soft, even glow․ This technique minimizes harsh shadows and highlights textures and architectural details․ Position fixtures 6–8 feet away for optimal coverage․ Adjust the angle to ensure light spreads uniformly, avoiding direct glare․ Ideal for large walls, this method enhances the exterior without overwhelming the space, creating a subtle yet elegant ambiance․
Garden and Landscape Lighting

Outdoor garden and landscape lighting enhances beauty, creates ambiance, and highlights focal points․ Strategic placement illuminates plants, pathways, and features, making your space inviting and visually appealing day or night․
5․1 Accentuating Plants and Shrubs
Accentuating plants and shrubs with outdoor lighting enhances their natural beauty and creates a striking visual impact․ Use cross-lighting to balance illumination, shadowing to add depth, or place lights at the base to highlight textures․ Positioning fixtures behind plants can create dramatic silhouettes, while washing techniques provide broad coverage․ This ensures your garden remains inviting and visually appealing, day or night, while maintaining functionality and safety․ Proper placement ensures optimal light spread for a captivating ambiance․
5․2 Cross Lighting: Balancing Illumination in Gardens
Cross lighting is a technique that balances illumination in gardens by using multiple fixtures to eliminate shadows․ Position lights at different angles and heights to evenly distribute light, accentuating textures and colors․ This method minimizes harsh shadows, ensuring a natural, balanced appearance․ Proper spacing and fixture selection are key to achieving a cohesive and visually appealing garden landscape, both day and night, while maintaining functionality and safety․
Security Lighting Placement
Strategic placement of security lights deters intruders and enhances safety․ Use motion sensors and bright fixtures around entry points and corners․ Position lights 9-10 feet high for optimal coverage and visibility․
6․1 Strategic Placement for Deterrence
Position security lights at entry points, corners, and along fences to create a visible deterrent․ Installing lights 9-10 feet high ensures they are out of reach and provide wide coverage․ Bright illumination discourages intruders and improves surveillance․ Motion sensors add an extra layer of security by activating lights when movement is detected, startling potential trespassers and alerting homeowners․ This strategic approach enhances safety and deters crime effectively․
6․2 Motion Sensor Lights for Perimeter Security
Motion sensor lights are a smart choice for perimeter security, detecting movement within a 180-degree range․ Mount them 9-10 feet high, angled downward to avoid glare․ These lights deter intruders with sudden illumination and alert homeowners to potential threats․ Energy-efficient and responsive, they enhance security without constant operation, ensuring your property remains safe and well-monitored around the clock․

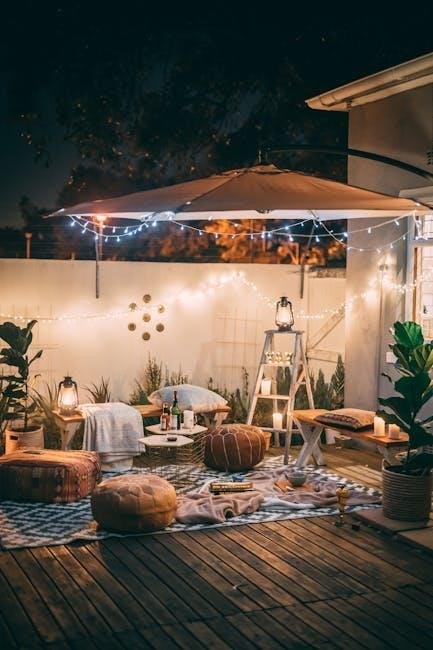
Deck and Outdoor Living Space Lighting
Deck and outdoor living space lighting combines safety and ambiance․ Use step lights for stairs and ambient fixtures for seating areas to create a inviting and secure environment․
7․1 Step and Railing Lighting for Safety
Step and railing lighting ensures nighttime safety on decks․ Install lights at each step edge or under railings to provide clear visibility․ Position fixtures 6-8 inches from the step edge for optimal illumination without glare․ Use motion sensors or timers for energy efficiency and added security in outdoor living areas․ Proper placement prevents accidents and enhances functionality effectively․
7․2 Ambient Lighting for Outdoor Entertainment Areas
Ambient lighting creates a welcoming atmosphere in outdoor entertainment spaces․ Use string lights, lanterns, or ground lights to achieve soft, even illumination․ Position fixtures to avoid harsh glare and ensure coverage across seating and dining areas․ Combine with timers or sensors for energy efficiency․ This approach enhances relaxation and functionality, making your outdoor oasis inviting for evening gatherings and events year-round․

Measuring and Sizing Fixtures
Measuring and sizing fixtures is essential for optimal outdoor lighting․ Ensure fixtures are proportional to the space and objects being illuminated․ Proper height and spacing ensure even light distribution, enhancing both functionality and aesthetics․
8․1 Choosing the Right Fixture Size
Selecting the right fixture size ensures optimal illumination and aesthetic appeal․ Fixtures should be proportional to the space and objects they light․ For entrance lighting, fixtures are often 1/4 to 1/3 the height of the door․ Path lights should be low-profile, while accent lights can vary based on the feature․ Proper sizing balances functionality and design seamlessly․
8․2 Proper Height and Spacing for Optimal Light Spread
Proper height and spacing are essential for even illumination․ Path lights should be placed 6-8 feet apart for consistent visibility, while taller fixtures like entrance lights are positioned 60-65 inches above ground․ Spacing ensures balanced light distribution, avoiding harsh glare or dark spots, and enhances both functionality and aesthetic appeal in outdoor spaces․
Final Tips for a Well-Lit Outdoor Oasis
Strategic outdoor lighting enhances ambiance, functionality, and safety․ Consider fixture size, spacing, and purpose to optimize illumination․ Regular maintenance ensures long-lasting effects and energy efficiency․
9․1 Avoiding Common Mistakes in Light Placement
Avoid overlighting, which can create glare and waste energy․ Ensure fixtures are at the correct height and spaced evenly for balanced illumination; Position lights away from obstructions like shrubs or trees to prevent harsh shadows․ Regularly inspect and maintain fixtures to ensure optimal performance and longevity, enhancing both safety and visual appeal effectively․
9․2 Maintenance and Energy Efficiency Considerations
Regular maintenance ensures longevity and optimal performance of outdoor lights․ Clean fixtures and replace bulbs promptly to maintain brightness․ Consider energy-efficient options like LED bulbs, which consume less power and last longer․ Use smart timers or motion sensors to reduce unnecessary energy usage․ Properly sealing fixtures from moisture prevents damage and enhances durability, ensuring your outdoor space remains well-lit and eco-friendly․